House Painters – Why You Should Hire Them

House Painters help homeowners improve their homes by adding a fresh coat of paint. This can make the home look newer and more attractive. However, choosing the right painting contractor can be difficult.

House Painters

Some things to consider when selecting a house painter include experience and expertise, credentials and licensing, cost, availability, and communication skills.

When it comes to enhancing the aesthetics and increasing the value of your home, professional house painters are an invaluable resource. From thorough surface preparation to superior craftsmanship, their expertise allows homeowners to achieve stunning results that can stand the test of time. When choosing a painting contractor, look for one that provides positive reviews and testimonials from past clients as well as licensing, insurance, and experience. This will help you to identify a reliable and reputable company that can meet the unique needs of your home and provide exceptional customer service throughout your project.

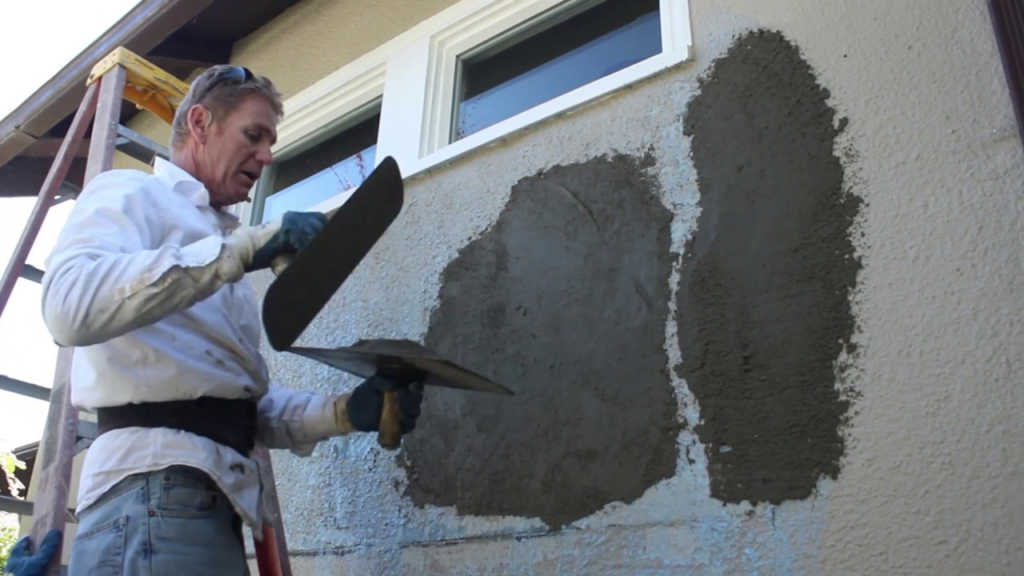
House Painters are skilled professionals who understand the intricacies of different surfaces, including wood, stucco, brick, and siding. They use premium-quality paints and materials and utilize advanced techniques to ensure that your home’s interior or exterior will be visually appealing and durable.

They also take the time to listen to their customers’ needs and goals, ensuring that they deliver results that exceed expectations. They have the tools and knowledge to handle any size or scope of painting project and are committed to providing an easy, stress-free experience.

Professional house painters are trained to recognize any potential issues that may arise during the project and to address them immediately. They are also knowledgeable about the latest advancements in painting products and technologies, allowing them to advise their customers on the best options for their homes’ specific needs.

In addition to their technical skills, House Painters are also highly regarded for their integrity and honesty. They are able to work closely with homeowners and other contractors to establish trust, respect, and a positive working environment. They understand the importance of communication and collaboration to complete projects on time and within budget, while maintaining high quality standards.

Hiring a reputable and reliable painting contractor is essential for achieving beautiful, long-lasting results. By taking the time to evaluate and compare quotes from several house painting companies, you can be confident that you are making the right decision for your home improvement project. Whether you are looking to transform your interior living space or add some curb appeal to your property, the team at 360deg Painting is here to assist you with your next big project.

Save Time

A professional house painter can save you time because they are skilled in the painting process. They know how to prep a room for painting and have experience in using tools like a power paint sprayer. They also have knowledge of different types of paint and what kinds work best for various applications. This means they can get the job done much faster than you would if you were to try to do it yourself.

Hiring a house painter can help you avoid making mistakes that could cost you money in the long run. If you are trying to do it yourself, it is very easy to accidentally apply the wrong amount of paint or leave spots unpainted. This can result in a poor-quality finish and may even damage your furniture or other belongings. Hiring a house painter can save you the stress and hassle of fixing these errors, and it will ensure that your project is done correctly from start to finish.

A good way to find a House Painter is to use a search engine. This will provide you with a list of local house painters in your area. Some of these painters are small, one-person businesses that have been in business for a short period of time. These painters are usually the least expensive, but they also may not have all of the necessary equipment like large ladders or insurance.

Some painters are larger companies that offer both residential and commercial services. These painters typically have more experience and take their work more seriously than the one-man-shows. They will probably have valid insurance and customer testimonials or references. These painters tend to be in the middle price range, but they are generally considered a safe bet.

Regardless of who you hire, it is important to make sure you get an estimate before starting any work. This will give you a clear idea of how much the entire project will cost, including labor, materials and paint. This will help you budget for the project and avoid any surprises down the road.

Avoid Mistakes

A well-executed paint job can elevate your home’s aesthetic and boost its market value. But like any DIY project, things can go wrong. That’s why it’s important to hire professional house painters. A seasoned pro can identify and avoid common mistakes that amateurs often make, ensuring your project goes smoothly from start to finish.

Some Painting Professionals Specialize in Certain Styles or Finishes

A good house painter knows how to prep a room for painting, and they’re skilled at applying different paint finishes. They can also recognize the right paints for your needs and recommend top-rated brands. This helps ensure that your home will look its best for years to come.

Some painters also specialize in certain types of paint projects, such as faux painting or textured walls. This can be an excellent choice if you have specific preferences or want to update your home with a unique design.

One of the most common house painting mistakes is not cleaning, sanding, and priming surfaces before applying a fresh coat of paint. This oversight can result in a rough, uneven finish that is more likely to peel. Professionals know the proper steps to take to prep a surface for painting and will avoid this costly mistake.

Another common mistake is failing to follow the manufacturer’s application and drying times for a paint job. This can lead to an unsatisfactory finish that is not durable or long-lasting. A professional will always follow the paint can’s instructions to the letter, ensuring a quality finish that lasts.

If you’re looking for a reliable and professional house painter, be sure to read online reviews. Websites such as Angie’s List, Yelp, and Google Reviews can help you find a local contractor with the right experience to meet your needs. You should also ask potential contractors about their licensing and insurance. This will protect you in the event that a worker is injured or your property is damaged during a painting project. A reputable painter will be more than happy to answer any questions you may have. They’ll also be willing to provide references.

Save Money

Painters usually charge for labor and materials, but savvy homeowners can save by doing some prep work themselves. Moving furniture to the center of the room or removing switch plates and outlet covers can help reduce the cost of the project. Some painters may even include these costs in their estimate, so be sure to ask.

Another way to save on painting costs is to buy paint during sales, especially if you’re planning on doing some touch-ups in the future. There are typically specific times of the year when paint stores hold their biggest sales.

Homeowners can also save on painting by sticking to neutral or light colors rather than dramatic changes of color, which are more expensive. Vibrant and vivid colors require extra priming and coats, which add up in both time and man hours.

A good house painter will ask you questions about your vision for the job and then provide a reasonable estimate. Be sure to review the entire estimate, especially the line items for labor, paint, and travel (if charged) to make certain that you understand what each item includes. It’s okay to ask your painter to break out these line items more specifically if they haven’t done so already, because it will be much easier to catch any hidden costs before the project starts.

House painters often have a wide range of skills and abilities, which allows them to work on many different types of homes. They’re also knowledgeable about how to care for surfaces that have been painted and can offer advice on proper maintenance and upkeep. This helps the homeowner extend the life of the new paint and reduces the need for repeat jobs in the future, which can save a lot of money in the long run.

While some painters choose to take part in union apprenticeship programs, others remain non-union and either operate as sole proprietors or small businesses with a handful of employees. This means that you’re likely to find a variety of prices for the same type of work, so it’s a good idea to compare these options before hiring.

Benefits of Microneedling

First, numbing cream is smoothed over the face. Then, the person performing the microneedling moves a pen-shaped device with needles over the face.

The controlled trauma and thousands of tiny pokes cause your body to start a healing process. New collagen fills fine lines and wrinkles, shrinks pores, reduces dark spots, and improves rough skin. Contact MICRONEEDLING SAN DIEGO now!

If you have acne scars, microneedling might be just what the doctor ordered. The treatment involves puncturing the skin with small needles, encouraging your body to regenerate collagen. It can also plump fine lines and wrinkles, smooth out rough texture, and even out brown spots and large pores.

During the procedure, your dermatologist will numb your face to prevent or lessen pain and discomfort. They will then use a penlike tool called a derma roller to insert tiny, stainless steel needles into your skin. The needles vary in length from 0.5 to 2.5 millimeters. They are spaced closely enough to cause “microinjuries” in your skin, but not so close that they cause bleeding or skin damage. The tool will then move evenly over your skin to create a uniform result. Some providers will apply a growth serum or other cream afterward.

The process is very quick and relatively painless, with little to no downtime. Some redness and irritation may occur, but this is a natural response to the minor injuries the needles cause in your skin. You should avoid using any products that might irritate the tiny wounds, including harsh cleansers, for the first 24 hours.

After a few days, the redness will fade and your skin will look smoother and more youthful. This is because the tiny holes created by the needles stimulate your skin to produce more collagen and elastin, which will make your complexion look smoother and healthier.

Another major benefit of microneedling is that it can significantly improve the appearance of acne scars, particularly pock marks. Studies have shown that after four treatments over a month, people with severe acne scars saw improvement in their skin tone and texture.

In addition to improving the appearance of acne scars, microneedling is also effective in minimizing stretch marks and other discolorations and in stimulating hair growth in those with alopecia. But a consultation with your dermatologist is key to determine whether it’s the right treatment for you. A dermatologist will be able to tell you how many sessions of the procedure are needed to achieve your desired results. Typically, those who want to reduce the appearance of fine lines and wrinkles will need just two treatments, while those with deeper scarring or burns might require more, as well as more frequent visits, depending on their needs.

Pock Marks

Many people who have pock marks from acne scars find that microneedling works very well to fade the appearance of these marks and smooth out the skin. When the needles puncture the skin, your body responds as if there is a real injury and starts producing collagen to repair the damaged area. This process is what leads to the smoothing of your scars and the overall smoother look of your complexion.

When you get a professional treatment, the practitioner will usually apply a numbing cream to your face so that you don’t feel the tiny needle pricks. Then, the technician will move a pen-shaped or rolling device with tiny needles over your face. The needles will make small cuts in the skin, which causes a bit of bleeding, and then your body will start the healing process. This stimulates the production of collagen, which helps reduce wrinkles and tightens skin.

During this process, your skin may experience some bruising or swelling for a few days, but it usually goes away without any further treatment. In some cases, you can get a more extreme reaction to the procedure, which is why it’s best to have this done by a professional who has experience and knows how to avoid causing an infection. It’s also important to avoid using self-needling devices unless you are absolutely certain that they are clean and sterilized to avoid an infection.

If you want to see a more dramatic improvement, consider getting microneedling in conjunction with PRP (platelet-rich plasma). In addition to the healing properties of your blood, this treatment also helps boost collagen and elastin levels. It’s also great for fading hyperpigmentation, especially in women with darker skin tones. Your dermatologist will draw a small amount of your blood into a test tube and then run it through a centrifuge to separate the platelets. Then, they will apply the platelet-rich blood to the skin that has been microneedled, and this combination is especially effective for fading dark spots and improving skin tone.

Rough Skin

Probably the best known microneedling benefit is that it helps your skin look a lot younger. It does this by stimulating your body to create more collagen and elastin, which in turn reduces wrinkles and fine lines and tightens your skin. During the procedure, small needles poke into your skin to trigger a rejuvenation response. You can do this in-office or at home with a device called a dermaroller. Typically, the needles on these devices are shorter than those in an office treatment, so they don’t create as many tiny wounds to your skin.

The pricks that you get from the procedure might make your skin a little red, but they will heal quickly. If your skin is particularly sensitive, your dermatologist might use a topical anesthetic or numbing cream first. Depending on the area being treated, it might take 20-30 minutes for it to work. During the actual microneedling, it might feel like you are having an electric toothbrush rubbed over your face. It might hurt a little, but it should only be a 2 or 3 on a pain scale.

In addition to reducing the appearance of scars, microneedling also improves rough skin. That’s because it helps your body remove any dead skin cells that might be clogging your pores, which can cause bumps and roughness. It can also help clear up acne and prevent future breakouts by reducing oil production on the skin, which is what causes black heads and pimples.

If you’re not ready to shell out $100-plus for an in-office treatment, there are a crop of products aimed at allowing you to perform your own microneedling at home. These are called dermarollers and they come in various prices. However, the needles on these DIY tools are much shorter than those on medical-grade equipment (0.5 to 2.5 mm) so they don’t create as many tiny holes to your skin, which limits their ability to stimulate collagen production.

The most important thing to remember about the procedure is that it may not work if you have bleeding or clotting disorders or are on blood thinners. Your dermatologist should ask about your medical history before you decide to do it.

Fine Lines & Wrinkles

Fine lines and wrinkles become more noticeable as we age, but microneedling can help reduce their appearance. The procedure uses a pen-shaped tool with tiny needles to make many small pricks in your skin. These pricks don’t cause much bleeding, but they do stimulate the skin to heal the wounds and produce collagen. The new collagen-rich tissue tightens the skin, smoothing out fine lines and wrinkles.

Microneedling is also an effective way to even skin tone and texture. During the treatment, your dermatologist will apply a numbing cream to prevent pain from the needles. They will then move the device over your face, creating tiny injuries that aren’t noticeable to the naked eye. They may finish the session by applying a growth serum or calming treatment to soothe your skin.

After the procedure, your skin might be red or flaky for a few days while it heals. It may also bleed or bruise slightly, depending on how deep the needles penetrate. Your dermatologist will provide you with care instructions to help your skin heal quickly. In the long term, your skin will look more even and brighter.

Your dermatologist will advise you to avoid skincare products that can make your skin more sensitive, such as strong exfoliants and retinoids. You should also tell your doctor if you have a bleeding disorder or take blood thinners.

A study published in the journal Plastic and Reconstructive Surgery tested the effectiveness of microneedling for acne scars. The study found that the procedure helped improve all of the scars in the test subjects. The results showed that patients with darker skin types (Fitzpatrick skin type IV and V) saw greater improvements than those with lighter skin.

The microneedling process can be done in-office or at home. In-office devices have sharper needles than those used in at-home kits, but both treatments are safe when used by a trained professional. If you choose to do your own microneedling at home, it is important to use a clean and sterilized needle, and to be careful not to over-prick yourself.

How Sealcoating Protects Your Asphalt

Sealcoating is an important process for protecting asphalt surfaces from weather and car pollutants. It will extend the life of your pavement and can save you money in the long run.

Sealcoating

The weather conditions must be right for a successful application. It can’t be too hot or too cold, and it should not rain within 24 hours of application. Visit https://www.rochesternysealcoating.com/ to learn more.

Before the actual sealcoating can take place, the asphalt surface has to be prepared. The pavement has to be clean, dry, and free of any debris, dirt, or oil stains. In addition, it is important to turn off the sprinkler system for the entire parking lot, and a fence or other means should be erected to block pedestrians and vehicular traffic from entering the area until it has been properly sealed and allowed to dry.

Once the surface has been cleaned, the cracks must be filled using hot or cold crack fillers to prevent water from seeping under the new coating and further damaging the asphalt. Next, the surface must be swept and washed to remove any remaining debris or dust. Depending on the size of the parking lot, you might want to consider renting a ride-on sealcoating machine with a squeegee or a spray system. Both of these tools allow for faster application and more accurate placement, as well as providing better traction for vehicles.

A quality sealcoat protects a paved surface by filling small cracks, increasing the surface’s friction, and adding a new layer of protection. This is essential for a smooth, safe driving surface, and is especially important for high-traffic areas such as shopping malls or airports. It also helps to prevent the expansion of small cracks into larger ones in winter, which can cause potholes and expensive repairs.

Another benefit of a quality sealcoat is its ability to prolong the lifespan of your asphalt. The seal coat acts as a protective barrier against the elements, weather, and even sun damage, keeping your parking lot looking like new for a longer period of time.

If you have an older parking lot, it is vital that you invest in a sealcoat as soon as possible to protect it from the elements and prevent damage. With proper care, your sealcoat can last for up to a decade or more.

A professional contractor will be able to advise you on the best maintenance schedule for your specific parking lot. They will also be able to identify any problem spots and address them early, saving you the expense of larger fixes down the line.

Application

Keeping asphalt in good condition requires regular maintenance and the application of sealcoat. This process prevents degradation caused by weather, vehicle traffic, oil spills, and other chemical substances that penetrate and soften the material. When the material is weakened, it becomes brittle and more susceptible to damage. Sealcoating provides a barrier that protects the surface, and when used properly, extends its lifespan significantly.

First, the surface must be thoroughly cleaned. A power broom or blower should remove any loose dirt, leaves, or debris. If there are any oil stains, a degreaser or detergent should be applied to eliminate them. If the area is especially dirty, a pressure washer may be needed to ensure a clean and effective finish. This initial step is essential; any sealant applied to a dirty surface will not adhere effectively and can lead to patchy areas.

Once the surface is ready for application, barriers should be set up to keep people or vehicles from entering the work area. This will allow the sealant to be applied evenly without disturbance and allow for a quicker curing time.

It is also important to choose the right type of sealcoat for your climate and weather conditions. Two primary types exist, coal tar-based and asphalt emulsion-based. Coal tar-based sealcoats are more durable, but can have environmental and legal concerns in some areas. Asphalt emulsion-based products are environmentally friendly and are commonly used for residential and commercial asphalt applications.

The type of sand used in a sealcoat mix is also important for the final product. Coarse and fine sand must be screened to ensure that the proper particle size is being used. Using a sand that is too coarse or too fine will result in a sealcoat that is too thick and will not flex or adhere well to the pavement.

Before the actual application of the sealcoat, it is essential that all cracks, potholes, and other damaged areas are repaired. This will allow the asphalt to be more evenly protected and extend the lifespan of the material.

Once the sealcoat is applied, it must dry completely before it can be used. This can take a few days depending on the temperature and humidity. The best way to speed up the drying process is by using a product such as nano-cure, which reduces the amount of moisture in the air and allows the sealcoat to dry faster.

Curing

Once the asphalt has been sealed, the process moves to the curing stage. This is a critical step that helps determine the durability and effectiveness of the sealcoat. During this time, it is important to keep the surface free from traffic as it cures. The best way to do this is by putting up temporary signs that direct people to use alternate parking areas or even to park at home during the curing process.

The curing process can take up to two days. During this time, the sand particles in the asphalt will interlock to create a strong bond with the new coating. This will give the sealcoat additional strength and resistance to damage from the elements and traffic. The temperature of the surrounding area also plays a role in how quickly the sealcoat can dry. For this reason, it is often better to apply the coating in warmer weather when conditions are more favorable.

Before the curing begins, the surface is swept to remove any debris. Once the surface is clean, a primer is applied to prepare the asphalt for the sealcoat. The primer has built-in polymers and surfactants that help it to penetrate into the polished aggregates, creating an adhesive surface for the sealcoating. This is an extremely important step in the overall application of the sealcoat.

After the primer has been applied, a thin coat of the sealcoat is then applied to the pavement. The contractor may use pressurized spray equipment, self-propelled squeegee machines, or hand painting techniques depending on the project requirements. Typically, a second thin coat is required and the entire work area must be adequately cured before vehicles are allowed back on the lot.

Depending on the type of sealcoat used, it can take 24 to 48 hours for the paving material to be ready for light pedestrian traffic and up to 72 hours for vehicle traffic. During this time, it is essential to avoid any type of oil spills or harsh chemicals that can harm the coating. Keeping the paved surface free of oil spills and regular cleanings will extend the life of the sealcoat and ensure that it is effective for years to come.

Maintenance

Keeping your asphalt pavement well maintained can extend the lifespan of your parking lot or driveway and help you avoid costly repairs in the future. The best way to maintain your asphalt is through regular sealcoating. Seal coating restores the jet-black appearance of your pavement, fills in cracks, and helps your surface resist water penetration. It is a simple, cost-effective solution that will enhance the look of your property while reducing the need for expensive repair and replacement.

Before sealcoating, it is important to make sure that the surface is free of debris. This includes weeds, loose gravel and dirt, and old sealant. The area should also be blocked off for 24 hours while the sealant cures. Sprinkler systems should be turned off, and all vehicles should be removed from the surface. This will allow the sealcoat to dry and bond properly.

Once the sealant is applied, workers will hand squeegee the edges to provide clean, crisp lines and extra sealer. This step is essential in ensuring that the new surface will be resistant to traffic. Once the sealant has cured, the surface will be reopened to vehicular and foot traffic. In order to protect the newly sealed surfaces, you should put up signs indicating that vehicles and pedestrians should stay off of the area until it is fully cured.

Ideally, your asphalt should be resealed every other year to extend the life of the surface. However, the frequency of resealing will depend on your climate and traffic volume. Consult a professional to determine the appropriate schedule for your specific needs.

Whether you have an industrial lot or residential driveway, a sealcoat will help extend the life of your pavement and minimize the need for expensive repair. It will protect your investment, enhance the look of your property, and increase its value.

Stucco Repair Is a Good Option For Surface Level Damage

Stucco Repair Philadelphia consists of sealing or repairing holes and cracks found in the stucco itself. It is a good option for surface level damage that does not involve mold or water damage to sheathing and framing.

Damp looking stucco, especially around windows, is a sign that moisture intrusion may be present. Moisture problems will only get worse if not addressed immediately.

Stucco is a beautiful and durable siding option for homes, but it’s not immune to wear and tear. Like all exterior surfaces, stucco needs to be properly maintained and repaired to keep it looking its best and functioning at its best. Cracks, stains, discoloration and other damage are not only unsightly, but they can also indicate underlying issues that require professional attention. If left untreated, these problems can escalate into more serious structural damage to the building envelope.

Small cracks in stucco can be easily fixed with caulking. Using a caulking gun, apply a caulk designed for use with stucco and smooth it out with a trowel to ensure it blends in with the surrounding surface. It’s important to allow the caulk to cure undisturbed for 24 hours, as this will give it a chance to properly set and harden, ensuring a long-lasting repair.

For larger cracks, a stucco repair contractor should be called in to help troubleshoot and decide the proper course of action. Cantor recommends that homeowners take a walk around their homes once or twice a month to look for damage, such as cracked or chipped stucco, holes, buckling or bubbling. It’s especially important to look up at your home from the ground to check for any bowed or leaning areas.

If the cracks are hairline, they can be fixed with a simple patching and painting. First, the cracks should be cleaned and brushed to remove any loose debris. Next, the crack should be primed with a product such as Smith & Co. Damp Concrete Primer (DCP), which is mixed with water to create a tan emulsion. This priming will help the caulk stick to the crack.

Finally, the crack should be patched with a stucco patching mix that is either pre-mixed and ready to trowel on or conventional stucco repair mix that can be mixed in a wheelbarrow or plastic tray according to manufacturer instructions. After the patch is applied, it should be troweled to match the texture of the surrounding stucco and left to cure for another 24 hours.

Structural Damage

Stucco’s durability and insulation qualities add value to buildings, but over time it can develop certain issues that must be addressed promptly. These problems may not only reduce the value of a home but also increase the cost of maintenance and repair. Detecting stucco damage in its early stages is critical to protecting the integrity of walls and preventing moisture infiltration that can lead to serious structural problems.

The most common sign of stucco damage is the appearance of cracks. While small hairline cracks are normal, it’s important to watch for larger cracks or widespread cracking. These can signal a major problem with the foundation or other structural problems within the building. Water stains and discoloration on the surface are another indication of moisture infiltration. If left untreated, this can lead to rot within the wall and a collapsed structure.

When moisture seeps behind the stucco, it can erode the wood support beams that hold up the walls and other portions of a building. This can cause a collapse of the entire structure or even other parts of the house. This can also rot the interior of the building and lead to health issues for residents.

Stucco repair is a complex process that involves meticulously assessing the condition of the stucco and identifying the source of moisture infiltration. Removing the damaged area and addressing the underlying problem will help to prevent future moisture infiltration. This may involve waterproofing, removing and replacing the damaged materials, or improving ventilation to decrease moisture buildup.

Many homeowners attempt to repair stucco themselves to save money but this can be a mistake. For example, covering a hole in the stucco with duct tape will not stop the leak but will instead make it worse. Hiring a professional who is experienced in stucco applications will ensure that all repairs are made properly the first time, saving homeowners from expensive repairs in the future.

For historic stucco, it’s particularly important to understand the history of the construction and the materials used for the original work. This is to ensure that the repair is carried out in a way that is compatible with the historical materials and does not exacerbate any deterioration that has already occurred. For example, using hard cementitious materials in the repair will increase the rate of deterioration since these are incompatible with the lime based render used for historic stucco.

Mold and Mildew

Stucco can withstand a lot of damage, but if moisture gets behind the surface, mold and mildew will begin to grow. If you notice a musty smell, stains, or discoloration, call a stucco remediation company immediately. Mold can lead to a number of health issues, including headaches, allergic reactions, and respiratory damage. If the mold is allowed to spread, it can also damage the integrity of the stucco and cause further deterioration.

Moisture behind the stucco can be caused by a variety of factors, such as flooding from heavy rains or incorrect installation. Moisture can get into gaps between the stucco and wood framing, through loose or broken window frames or doors, and even through cracks. Moisture can also be a result of a home being located in a humid or rainy climate, which accelerates the wear and tear on stucco.

The best way to prevent mold and mildew from growing on your stucco is to keep up with regular maintenance inspections, which should include checking for cracks and other problems. Small hairline cracks can be sealed with a caulking compound, which will stop them from widening and allowing moisture to seep through. For larger cracks, it is best to consult a stucco professional.

Another thing to look for during an inspection is the condition of exterior weather barriers and flashing. These will need to be replaced or repaired as needed to ensure that water is not being allowed to penetrate the stucco and into your home.

Remediation is a more expensive service than simple repairs, and it’s understandable that homeowners may not want to invest in this unless they need to. However, continuing to postpone remediation will only lead to skyrocketing repair costs in the future.

Remediation is a more in-depth service than simple repairs and involves digging down through the stucco to find and fix the underlying issue that’s causing the deterioration. This can be as simple as repairing a hole in the wall, or it can involve inserting probes into suspected areas of moisture to take a reading and determine how extensive the problem is.

Water Damage

Stucco is a beautiful, durable material that offers many benefits for homes and buildings. However, like any other material, it can be damaged by moisture and water. The resulting damage can result in unsightly spots, mold and mildew, or structural damage to the home or building. If the cause of the water damage is not addressed quickly, it can lead to costly repairs or even a full replacement.

One of the most common causes of stucco damage is water leaks that go unnoticed and allow moisture to get behind the walls. A professional inspection can reveal the extent of the problem, which may include a leaking roof or faulty plumbing. In some cases, the cause of the water damage to the stucco may be covered by homeowners insurance.

If you are concerned about your stucco, it is important to walk around the outside of your home once a month and inspect it for chips, cracks, holes, buckling or bubbling. It is also a good idea to use a ladder to check the upper levels of your home, as this is where moisture can accumulate. If you notice any signs of moisture damage, a professional can use a moisture meter to determine the extent of the moisture and recommend a suitable repair solution.

Other signs of water damage to stucco include damp looking areas, especially after a rainstorm, and stains or discoloration on the surface of the stucco or interior walls. Peeling paint can also be an indicator of moisture problems, as well as a musty smell inside the house.

When performing stucco repairs, it is important to follow all applicable safety procedures and wear appropriate personal protective equipment (PPE). A moisture meter and a thermal imaging camera are useful tools for identifying the level of moisture in the stucco before starting the repair process. Using these tools will help to ensure that the repair is successful and that the problem is completely resolved. It is also a good idea to conduct a quality assurance check of the repaired area with the moisture meter and thermal imaging camera once the work has been completed.

Important Considerations For Restroom Trailer Rental

Restroom trailers offer a more sanitary alternative to traditional porta potties. They feature flushing toilets, running water, and hand sanitizer, elevating cleanliness and health standards. They are also ADA compliant and offer more luxurious features like climate control.

Restroom Trailer

Many factors influence restroom trailer rental costs, including size, location, and peak season pricing and availability. It’s important to understand these factors before making a purchase. Contact Porta Potty Rentals now!

Whether you’re hosting an event in the bustling city or a serene lakefront setting on Long Island, you want to make sure your guests have access to high-quality restroom facilities. Restroom trailer rentals provide comfort, privacy and a touch of luxury to your events, no matter the size or location. They are available for rental on a daily, weekly or monthly basis and can be customized to suit your needs.

The cost of a restroom trailer can vary depending on the rental period, trailer size and location, as well as any additional amenities you choose to add on. For example, you can rent a two-stall restroom trailer for less than a four-stall model. Two-stall trailers also take up less space, which is ideal for smaller areas where four-stall trailers may be too large to fit. Another factor that influences the cost is the location of your venue and how far the vendor will need to travel to deliver the rental unit.

In addition to providing a restroom facility, you can use a restroom trailer as a changing station or photo booth for your event. Most trailers are equipped with warm lighting, which looks great in pictures and makes for a welcoming environment for your guests. You can also customize the stalls with decorations to match your event theme.

Unlike standard portable toilets, which are often too hot or cold, or smelly, restroom trailers have temperature control systems to ensure that your guests stay comfortable and refreshed throughout the day. This can be especially important for weddings and other formal events, where your guests may be spending a lot of time in the restroom.

A bathroom trailer is also a great option for corporate retreats that take place in remote locations without easy access to restrooms. The restroom trailer will give your employees a place to refresh themselves and feel comfortable during the entire retreat, which will help them focus on their work and improve productivity. In addition, a restroom trailer is an excellent choice for outdoor weddings, festivals, and other special events.

ADA Compliant

ADA-compliant restroom trailers are designed to meet and exceed the strict guidelines set by the Americans with Disabilities Act (ADA). These standards include spacious interior stalls, wider entryways, and other features that make it easier for individuals with mobility challenges to use portable toilet facilities. These features are crucial to ensure that all guests can have access to clean and comfortable restrooms, regardless of their ability level.

Moreover, these restrooms are also much larger than standard porta potty rentals. This makes them more aesthetically pleasing and much more convenient. This is particularly true for families with children who may need to use the restroom multiple times. In addition, ADA toilets are equipped with grab bars and easy-to-use fixtures that help disabled guests to navigate the space more easily.

In fact, ADA-compliant portable restrooms are a must for any outdoor event that’s expecting disabled guests. It’s both a legal requirement and a moral imperative to provide accommodations for those with disabilities. Fortunately, you can meet this requirement by renting a handicap restroom trailer from CALLAHEAD. We offer a wide range of wheelchair accessible restroom trailers that are suitable for short-term or long-term rental. From a single handicap restroom trailer to multi-stall units that combine a standard portable toilet with a handicap stall, you can find the perfect solution for your needs.

We have a variety of ADA compliant restrooms for rent in New York, including basic models for casual events and luxurious trailers with climate control and premium fixtures for weddings. These units will fit seamlessly into the style and tone of your celebration and enhance the overall guest experience.

Besides offering greater convenience for disabled guests, ADA-compliant restroom trailers are easier to install and operate than traditional portable toilets. They feature quick-connect plumbing and electrical hookups that make it easier to set up and move them around the site. In addition, these portable bathrooms are designed for efficient traffic flow, which reduces wait times during high-usage periods.

If you’re planning an event, it’s a good idea to have at least one ADA bathroom per 20 porta potty rentals. This is known as the “5% rule.” It’s important to keep in mind, though, that not all disabled attendees will need an ADA-compliant bathroom. In fact, abled people sometimes use ADA bathrooms out of convenience, so it’s important to consider your guests’ needs and include more ADA-compliant bathrooms than necessary.

Placement

One of the most important considerations for restroom trailer rental is the location. It should be on stable ground and near the area where you need to hold the event. This will minimize disruption and maintain ambiance for your guests. Also, consider that your restroom trailer may need water and electricity connections. So, make sure the location is easily accessible for your crew and that you have the necessary permits if needed.

If you’re hosting an outdoor event, the last thing you want is for your attendees to have to trek far from their seats to find a bathroom. A luxury restroom trailer adds comfort and convenience to any outdoor event, especially when you have many people in attendance. If you’re planning a corporate retreat, for example, it’s important to have a mobile restroom unit nearby to ensure employee comfort and productivity. Likewise, if you’re putting on a music festival, a bathroom trailer is a must-have for your guests.

Unlike porta potties, luxury bathroom trailers are spacious and provide plenty of privacy. They are also a great way to upgrade your event and make it more memorable for your guests. You can use the stalls to set up a photo booth or create a space for performers to relax and recharge. In addition, the warm lighting of a restroom trailer will look beautiful in photographs.

You can also customize your portable restroom rental by choosing from a variety of add-ons. These include hand sanitizer stations, air fresheners, and lighting for nighttime events. These amenities help keep your restrooms clean and reduce wait times during peak times. Additionally, some companies offer a variety of additional services, including cleaning, maintenance, and delivery/pickup.

It’s also important to hire your restroom trailer rental company early. If you wait too long, the best units may be booked or unavailable. Additionally, some portable toilet rentals don’t include supplies like air fresheners or hand sanitizer, so you’ll need to purchase these separately. Also, if you’re renting for a longer period, you can save money by choosing a monthly or weekly rental rate instead of a daily rental.

Maintenance

A clean restroom trailer provides a comfortable place for workers and guests to go when they need to use the bathroom. A clean restroom trailer is also important for maintaining a safe environment. To make sure that the restroom trailer is clean and sanitary, it should be cleaned on a regular basis. In addition to cleaning, the toilets must be flushed and stocked with supplies, such as paper towels, soap, and hand sanitizers. The restroom trailer should also be inspected regularly for leaks and other maintenance issues.

When choosing a restroom trailer rental company, look for one with extensive industry experience. An established history in the restroom trailer rental industry demonstrates that the company is able to navigate the intricacies of event planning and deliver a high-quality portable restroom solution. Experienced companies also have a refined understanding of the requirements that differ between events and construction sites, which can impact the restroom trailer design.

The company’s customer service and response time are also important considerations when evaluating different restroom trailer rental companies. A reputable company should provide an immediate response to all inquiries and provide thorough support throughout the rental process. It is also a good idea to choose a restroom rental company with a proven track record of delivering quality portable restroom solutions on time and within budget.

Before the rental period begins, the restroom trailer should be inspected to ensure that it is clean and functional. The company should check that all fixtures are working properly and that the water tank is full of fresh water. The company should also refill the toilet paper, soap, and sanitizer dispensers.

In addition, the restroom should be swept and mopped to remove any dirt and debris that may have accumulated. Then, the restroom should be disinfected with a mild cleaning agent. Finally, the floor should be wiped dry.

The ANSI standard for construction sites is that the toilets should be cleaned at least twice a week, depending on the number of workers. Providing employees with access to clean, state-of-the-art restrooms increases their morale and boosts productivity.

Fees for Renting a Dumpster

Whether you’re undertaking a major renovation project, cleaning out an estate or office cleanout, or just spring cleaning, a dumpster rental can help. This service is an eco-friendly and convenient way to get rid of unwanted waste.

Dumpster

In order to run a successful dumpster rental business, you need to know the right marketing strategies. The following tips will help you make the most of your advertising budget and attract more clients. Contact Baltimore County Waste Management now!

Dumpsters are large, open containers that are used to hold waste. They are often rented for a set period of time and then emptied when full. They can be used to dispose of large quantities of trash and debris from construction projects, home renovations, and general cleanups. They are often made of metal or steel and have a flat, open top. Some dumpsters are portable while others are anchored to the ground for stability.

WM offers a wide range of roll-off dumpster sizes, so you can find the right one to fit your needs. Our rental service is quick and easy, with convenient scheduling and account management tools. You can also trust that we’ll provide up-front pricing and honest expertise. We’re here to help you get rid of your unwanted waste, and we’ll take care of it from start to finish.

If you’re planning a big renovation project or just need a place to store your junk, a dumpster is a great solution. Dumpsters are designed to hold bulky materials and can handle a lot of weight. In addition, they’re easy to maneuver and can be picked up with a truck or crane.

There are many different types of dumpsters available for residential and commercial use. Some are large, while others are small and compact. Each type has its own unique features and uses. Some are even made of plastic, which is a popular choice for environmentally conscious individuals.

Dumpsters are typically rented by businesses to help them manage their waste. They’re also used by households for a variety of purposes, including spring cleaning and decluttering. These containers are a safe and efficient way to remove large amounts of waste from your home or business. But if you’re not familiar with the different types of dumpsters, it can be difficult to know what size and type is best for your needs. Here are a few tips to help you choose the right dumpster for your project.

Types of waste that can be disposed of in a dumpster

Most types of waste can be disposed of in a dumpster, including household waste, construction debris, yard waste, and metals. However, it is important to understand that there are certain materials that cannot be thrown in a dumpster because of environmental and safety concerns. For example, flammable and toxic materials should not be placed in a dumpster, and they should be taken to a hazardous waste disposal center.

When you’re preparing to tackle a big home renovation project or yard cleanup, a dumpster rental can be an excellent option for managing your trash. You can also use it to dispose of old furniture, appliances, and other clutter that piles up around your house. The best way to ensure a successful waste removal process is by knowing the rules that govern dumpster rentals in your area. Most areas have local and state regulations that specify what can and cannot be disposed of in a dumpster. These guidelines are usually published by the waste management department of your municipality and are available online.

There are several different sizes of dumpsters that can be rented for different purposes. The most common is a 20-yard container, which can hold roughly 6 pickup truck loads. This size is typically used by homeowners and contractors working on medium-sized projects. You can also rent a 30-yard dumpster for larger-scale projects, such as a complete home remodel or removing old roofing materials.

A dumpster can also be used to dispose of e-waste, such as computers, printers, and cell phones. However, some e-waste may need to be registered as a hazardous material and require specialized disposal. In addition, some dumpsters have weight limits that prohibit the storage of extremely heavy materials, such as concrete and dirt.

Some types of debris can be disposed of in a dumpster, such as tree branches and stumps. Most locations will allow these items to be put in a dumpster, but it is important to check the regulations before you begin your project. Some locations have restrictions on how many stumps can be disposed of at one time, and you may need to pay an extra fee for disposing of them.

Rules for filling a dumpster

When it comes to dumpster rental, there are many different rules that must be followed in order to ensure that the waste is disposed of properly. For example, you should never throw any hazardous materials into the dumpster. These materials can cause serious harm to the environment and can even pose a threat to the health of humans. Some examples of hazardous materials include asbestos, kerosene, and paints.

It is also important not to overfill the dumpster. If you do, you will be charged a fee for the extra garbage. Also, overfilling the dumpster can be dangerous for the hauler when it is being picked up. Moreover, it can damage your property.

In order to avoid this problem, you should always rent a large enough dumpster for your trash. The most common dumpster sizes are 20-yard and 40-yard. However, some companies may offer other types of dumpsters as well. Make sure to check with the company before renting a dumpster so you can be sure of the exact size of the container.

Another rule to keep in mind is not to put any sharp items into the dumpster. These can cause serious injuries to the hauler or other people who are picking up the garbage. Lastly, you should not put any liquids into the dumpster. This can create a mess and attract pests.

Before filling up the dumpster, start with the oversized and bulky items. This will give you more space for the smaller debris. It is best to break down bigger wood pieces and boxes into smaller sizes before adding them to the dumpster. This will save you time and money.

Some wastes, such as sludge, may be forbidden by landfills. These wastes are usually contaminated with explosives, toxins, and other hazardous substances. In addition, they can also contaminate the surrounding environment.

In addition, some wastes are prohibited by state regulations. These wastes should be taken to a hazardous waste facility. Other prohibited wastes include stumps, padded or upholstered furniture, and mattresses. These items take longer to process, and some landfills have banned them altogether.

Fees for renting a dumpster

Many dumpster rental companies charge a variety of fees. These may include a flat fee for pickup and delivery, weight limits on the dumpsters, extra days, and hazardous waste fees. You should always ask about these fees before signing a contract with a dumpster rental company. The best way to avoid these extra charges is to rent a dumpster that is the right size for your project. This can save you money by avoiding overage and underage charges.

Dumpsters are a great way to get rid of unwanted debris and trash. They can be used to remove construction debris such as drywall, floor tiles, and roof shingles. They can also be used to dispose of yard waste. However, if you are disposing of a toxic or hazardous waste, it is important to contact your local government or municipality for safe disposal options. Some items, such as hot water tanks and ink cartridges, cannot be thrown away because they contain chemicals that can explode. You can also expect to pay a disposal fee for e-waste, mattresses, and hazardous waste.

There are a variety of factors that can affect the cost of renting a dumpster, including landfill dumping costs, location, and container sizes. Dumpster prices tend to be higher in urban areas, where the dumpsters are more expensive and less accessible. Generally, dumpster prices are lower in rural areas because of lower landfill dumping fees and closer proximity to dumping sites.

Some dumpster rental companies offer flat-rate pricing, which bundles all the fees into one price, making it easier to budget for your project. However, some companies may add additional fees for overflow, overage, and remote delivery locations. These extra fees are usually charged per mile and are designed to cover fuel expenses and truck wear and tear.

Several factors can impact the cost of renting a dumpster, including the type and size of debris, and the duration of the rental period. Ideally, you should plan your waste removal project to coincide with low dumpster prices, such as those during the winter. This will ensure that you have the dumpster you need when you need it and will avoid paying higher prices during busy times.

Skills You Need to Be a Painter

The art of painting is widely exhibited in galleries and museums, and is a popular form of creative expression for people of all ages. To be a good painter requires mastery of several different skills.

The first is technical: how to handle your tools, such as brushes and materials, and your skill at understanding the characteristics of those materials. Click Visit Website to know more.

Painters use their artistic skills to create artwork that engages the viewer and conveys a message. They may explore a variety of techniques, including brushwork and texture, to achieve a specific effect or style. They also consider the composition and placement of elements in their paintings to ensure they are creating a cohesive piece that is meaningful to the audience.

Developing good painting technique requires practice and patience. It is important to watch how master painters paint, and try to mimic their movements. This will help you develop your own style, and it will also allow you to identify any bad habits that you might be developing. For example, you might have a tendency to over-work certain areas of the canvas, or you might use too much paint for certain colors. Identifying these habits is the first step to improving your painting technique.

One of the most important things to keep in mind when painting is the light source. This will influence the colors you use, and it will also determine how light or dark a particular area is. It is important to note the lightest areas, and work from there. For example, if you are painting a portrait, you will want to start with the eyes and mouth, as these are typically the lightest areas in the face.

Painting is an excellent way to express yourself, and it can be a great way to relieve stress. It is also a fantastic way to get your creative juices flowing, and it can be a fun hobby or a great career. Whether you are just starting out, or you are an experienced painter, there are always new challenges and new ways to improve your technique.

Many painters work in art galleries and museums, where they can display their artwork to the public. They may also work on commissioned pieces, either for businesses or private individuals. These commissioned pieces can be anything from murals to landscape paintings to restoration projects on historical or cultural sites. Some painters also work in specialized art studios and educational institutions as instructors or artists-in-residence. Others are self-employed and sell their artwork through online platforms or art markets.

Observation

Observation is the ability to notice the details of a subject. It’s an important skill for any artist because it allows them to see how things look and how they interact with one another. The more you practice this skill, the better you will become at noticing the smallest things.

A painter uses observation to create realistic paintings. This technique requires patience and careful attention to detail. It involves studying the subject closely and recording the smallest details in a drawing. It also includes analyzing the color of the subject and how it interacts with other colors.

To develop this skill, a painter should spend time in nature and observe the environment around them. They should also learn to identify different textures. Observation can help an artist understand the different characteristics of a subject, such as its size, shape and texture. It can also help them determine what to include in their painting.

It is a vital skill for any art creator, especially when creating miniature paintings. Observation helps them to see the smallest details of their subject and bring them to life on the canvas. It is also helpful for determining the best way to construct a scene or figure.

Many artists struggle with their miniature painting skills due to the limitations of their hands and eyes. But, this is not necessarily because they lack the artistic ability to succeed. Instead, it is usually because they aren’t observing the subject correctly.

This is why it’s important to have an art coach. An artist’s coach will be able to teach them how to observe the subject correctly and then translate it into their work on the canvas.

In fact, if you’re looking for a more personalized and hands-on experience, consider joining an online art class with a professional art tutor. An artist’s coach will be a great asset in helping you achieve your goals and master the art of miniature painting.

In the end, it’s all about observing the world around you and using that knowledge to make beautiful paintings. It’s like visual archaeology: making the unobvious obvious, the unseen seen and the meaningless meaningful. It’s a process of becoming synchronised with reality, to appreciate it in all its complexity.

Design

A painter creates artwork that enhances the world around us, adding beauty and interest to public spaces, homes, and commercial buildings. This art form transcends simple surface decoration, though; it often conveys complex emotions and ideas that can connect people across cultures and generations.

To achieve a high-quality finish, a painter must be able to plan and execute their work with precision. This involves calculating the materials required and the amount of time needed for each project. It also requires the ability to make adjustments as necessary to ensure a consistent, quality result. Painters often work on multiple projects at once, so it is important that they can prioritize tasks and manage their time effectively.

The painting industry is highly competitive, so it is important for painters to have excellent customer service skills. This includes being able to answer questions clearly and explain the process in a way that is easy for customers to understand. It also involves ensuring clients are happy with the finished product and providing them with accurate estimates for each job.

Painters must be familiar with a wide range of products and equipment, including various types of paints, primers, stains, plasters, and varnishes. They must also be able to identify and differentiate between various textures, glare, viscosity, and other properties. This knowledge is critical when choosing the right paint for a particular surface and ensuring that it is applied correctly.

Painting is a physically demanding job, so painters must have strong physical dexterity. They need to be able to lift and carry heavy objects, stand for long periods of time, and use ladders and other equipment safely. It is also important for painters to be able to work well under pressure, as they often have tight deadlines to meet.

Because painters work in many different environments, they need to have a good understanding of environmental and safety regulations. This includes being able to follow guidelines for minimizing waste, protecting surfaces from damage, and using environmentally friendly paints. They should also be able to handle different types of equipment, including power and hand tools, sprayers, rollers, and brushes.

Composition

One of the most important skills a painter can have is composition. This is the ability to arrange the various elements of a painting in a way that will draw the eye in and keep it engaged throughout the work. This includes arranging the subjects that will make up a still life, but also how to frame a landscape and even the arrangement of the brushstrokes themselves.

Composition is all about the overall balance of the work. Is it symmetrical or asymmetrical? Symmetry gives a sense of calm and harmony, while asymmetry can create feelings of chaos or imbalance.

Whether you’re working with a symmetrical or asymmetrical arrangement, it’s important that the focal point of your painting is supported by the design and value patterns that lead up to it. Using directional shapes, hard edges in the right places and clever use of values will all help to support your focal point and direct the viewer’s eye where you want it to go.

Another area where a painter needs to be careful is with the balance of light and dark. Too much of one will overwhelm the other and can cause a sense of unease in the viewer. You can achieve this by contrasting dark and light areas in your painting, or by creating a sense of depth through the use of shadows.

Lastly, it’s also important to consider the scale of your subjects or objects. Suppose you’re trying to convey a sense of perspective in your painting. In that case, this can be achieved through the use of linear perspective (closer objects are larger than those further away), aerial perspective (distant objects lose detail and contrast) or overlapping (closer objects obscure those that are further away).

Composition is just one of many important skills a painter needs to have, but it’s one that’s often overlooked by beginning artists. Taking the time to practice these skills and develop them will help you become a better painter, allowing you to capture your subject’s essence more effectively while still making sure that the finished painting is engaging for the viewer.

Types of House Ceilings

The ceiling is an overhead interior surface covering the upper limit of a room or other structure. It can be plain or decorative.

A high ceiling can make a small room feel larger & a large room feel even more spacious. But it can also cost more to heat & cool a space and can be difficult for shorter individuals to reach for light bulbs or to clean. Contact Ceilings Perth now!

Wood beams on ceilings are a popular design feature for traditional and contemporary styles alike. Properly installed and stained, wood beams insert structural elegance into a room and add warmth to the space. They can also create a focal point that’s both striking and memorable.

Beams on a ceiling are often called joists or rafters, depending on whether they’re functional or decorative. If they’re functional, they run horizontally across a ceiling and help support the roof, while rafters are sloped to follow the pitch of the roof. If they’re purely decorative, they can be called wooden beams or faux beams and are available in a range of sizes, styles, and finishes.

A beamed ceiling can be constructed with either wood or steel. Structural steel beams are heavy, and they require an engineer’s approval to be used as exposed ceiling beams. To avoid this hassle, a modern vaulted ceiling is usually built with scissor trusses and then covered with drywall. Faux beams can then be added to the drywall for a rustic appearance. Molded fiberglass or polystyrene faux beams are lightweight and can be stained before installation.

Reclaimed wood beams are an excellent choice for a beamed ceiling because they exhibit visible crosscut marks and a rugged look. These features give them an Old Country style that complements a farmhouse, mountain cabin or woodland cottage. A more subtle approach is to coat beams with limewash paint for a softer color palette that suits coastal decor. This technique rejuvenates the wood for a fresher, more enduring finish.

Another option is to use steel I-beams as exposed ceiling beams. These are surprisingly light and versatile for such an industrial style. They can be left raw and unstained for a streamlined, modern decor or painted for a more traditional or contemporary feel. Structural metal beams, however, can have more deflection distance than is code-safe or desirable and can lead to sagging of the ceiling.

A coffered ceiling has a grid of square or rectangular boxes that form patterns similar to those of a waffle-type pattern. This ceiling design can make a room look taller and more interesting, and it also helps absorb sound that might otherwise bounce off a flat ceiling. It’s an ideal design for bedrooms and family rooms, where the sound absorption can reduce noise from other parts of the house or workplace.

Flat Ceilings

Whether you’re building your dream home or enhancing an existing one, it’s important to think beyond the four walls of your space. Ceilings impact the overall feel of a room, how much light comes in and even your home’s resale value. For this reason, you should be aware of the different types of house ceilings that are available for your custom home or renovation project.

The most conventional and cost-effective type of ceiling is a standard flat ceiling, which is typically finished with drywall and painted just like the walls in your house. This is an easy construction style that can give your space a clean and simple aesthetic that is perfect for minimalist and transitional homes.

While a traditional flat ceiling is the best choice for many homes, some homeowners opt for a textured look to add a bit of interest to their spaces. While this is still common in some modern houses, it’s important to consider the drawbacks of a textured or popcorn ceiling before making the decision.

If you’re considering a textured ceiling, be prepared to invest time and money into maintenance. When it comes to repairing this type of ceiling, you will need to re-texture the entire area if a section is damaged. Re-texturing isn’t as easy as simply applying a new coat of paint, and it requires skill and patience to achieve a seamless surface.

Another consideration is that a textured ceiling is less energy efficient than a smooth ceiling. This is because heat rises, which means more of your furnace’s energy is being used to keep the space warm.

For those that don’t want to invest in a full flat or coffered ceiling, tray ceilings are an excellent option. Similar to a flat ceiling, this design includes a recessed section that is a few inches lower than the surrounding area. This can include a single tray or multiple trays nested together to create a graduated effect.

Tray ceilings are usually made of a combination of wood and steel, which adds both style and functionality to your custom home. While a tray ceiling can be used in conjunction with vaulted ceilings, it is often most common in smaller rooms because of the extra light it provides.

Slope Ceilings

Sloped ceilings may seem like a challenge to work with, but there is plenty of design potential for a living space with a sloped ceiling. Sloped ceilings add a unique character to a room and can create a beautiful focal point. Sloped ceilings can also make a room feel more spacious by adding height to a living area. Depending on how they are designed, these ceilings can even help with the overall lighting in a room.

Slopped ceilings can be made of any material, including wood, steel, or plaster. They can also have a variety of finishes, such as paint, stain, or natural finish. They are often found in older homes and some newer buildings. Sloped ceilings are also common in attic rooms and loft spaces.

When it comes to installing a ceiling in a home with a sloped roof, it is important to check local building codes. The code regulates how high a sloped ceiling can be before the space underneath it is no longer considered living space. In most cases, a ceiling must be at least 7 feet high in order to qualify as living space.

If you’re looking to install a sloping ceiling, it is important to use a qualified designer to ensure the proper design. A professional will consider your budget and lifestyle as well as the location of your home when preparing a sloped ceiling design. They will also make sure to follow all regulations when it comes to fire safety.

Sloped ceilings are commonly used in bedrooms and living rooms. They can also be used in kitchens. However, it is important to remember that sloped ceilings require a lot of light, which can be difficult to provide. This is especially true in a kitchen, where task lighting is essential.

There are a few ways to light a sloping ceiling, including using recessed lights. A recessed light fixture can be installed on the wall or ceiling, and can be either fixed or adjustable. Fixed recessed lights are cheaper, but they do not adjust to the slope of a ceiling. Angle-cut fixtures are more expensive, but they can be adjusted to match the slope of a ceiling.

Shed Ceilings

A shed ceiling is a sloped ceiling that begins at a high point at one wall and slopes down toward the other wall. Shed ceilings can create a unique look for a home and offer designers some flexibility with their construction. The type of wood used to form a shed ceiling can be varied and often includes heavy beams. These heavy beams can either be load-bearing or decorative. For load-bearing beams, a specialized joist system is often employed to add strength to the structure of the room below. For decorative beams, a variety of materials can be used, including reclaimed barn boards or prefabricated roof trusses.

Shed ceilings often require more structural support than do flat or vaulted ceilings, since they have a higher center of gravity. Because of this, they may also be more expensive to construct and install. To reduce costs, builders sometimes use prefabricated roof trusses to frame the shed ceiling. This method is faster and less labor-intensive than building individual joists, but it still requires a significant amount of work to complete the job.

When a shed ceiling is constructed with a truss system, it can be a good choice for a homeowner who wishes to use the space for storage or living purposes. It can also be a good choice for homeowners who want to incorporate natural lighting into their homes, since the shed roof’s slope can allow for floor-to-ceiling windows, particularly those located closest to the high walls of the house.

However, homeowners should carefully consider the position of their shed ceilings when considering window placements. A too steep incline can limit the amount of natural light that enters rooms, while an excessively flat angle can compromise the integrity of the roof. The optimum slope for a shed ceiling should be determined by conducting a thorough analysis of the sunlight and weather conditions in a given area to ensure that the shed ceiling will provide optimal lighting for indoor spaces while avoiding sun glare and maximizing energy efficiency. To do this, a roof expert should be consulted.

Search Engines And Smiles – Maximizing Visibility For Dental Practices

Search engines personalize results to match users’ locations and past searches, making local SEO For Dentists an essential strategy for dental practices. Boost your visibility with proven tactics that showcase your practice’s expertise and draw in new patients.

Guest posting on reputable websites within your niche and networking with industry peers can generate valuable backlinks and increase website visibility. Share before-and-after images and educational content to connect with your audience and demonstrate your professionalism.

dental seo

Website Optimization

A dental practice’s website is its first and most important tool for converting online interest into new patient appointments. Optimizing the website with targeted keywords and implementing powerful functionality like live chat support and scheduling capabilities allows dentists to maximize the return on their SEO investment.

Website optimization also includes ensuring the site is easily navigable for potential patients, with clear and informative content. This helps to build trust and establish the dental practice as an authority in its field. It is vital to regularly evaluate and improve the user experience on your website to identify areas for improvement and continue to drive traffic.

Local SEO is another essential strategy for dental practices, ensuring that the search engine understands that the site is relevant to local searches. For example, many people search for terms like “Invisalign near me” or “dental implants near me” when looking for a new provider. By optimizing local SEO, dental practices can ensure that their content is displayed at the top of search results for these queries.

In addition to local SEO, it is crucial for dental practices to ensure their websites are optimized for mobile devices. This includes using responsive design, creating mobile-friendly landing pages, and utilizing features like geolocation. Keeping the website optimized for mobile will help to ensure that potential patients can easily find the information they need and book appointments online.

In addition to these foundational SEO strategies, it is critical for dental practices to continually stay on top of emerging SEO trends. Regularly reading reputable SEO blogs and participating in SEO conferences can provide valuable insights to help stay ahead of the competition and improve online visibility.

Social Media Marketing

The internet has made it easier for potential patients to search for dental care. The more information a dentist can provide online, the better chance they have of attracting and booking new patients. A website that clearly explains services, procedures, and office policies is an essential first step in increasing your practice’s visibility online. Additionally, optimizing your online presence with local SEO, content marketing, and Pay-Per-Click (PPC) advertising are all effective strategies to improve your online reach.

Adding a blog to your website can help establish you as a thought leader in dental health and hygiene. Creating short videos to showcase office tours, explain procedures, and feature patient testimonials can also be an effective way to attract new visitors and build trust with prospective patients. Sharing these videos on your social media accounts can further expand your reach and boost visibility.

Listing your dental practice in relevant local directories can also improve your online visibility. Make sure your name, phone number, and address are consistent across all listings and that all information is up-to-date. Implementing local business schema is another way to optimize your search engine ranking, as it allows Google to display critical information like appointment availability directly in a search result. Similarly, incorporating review schema markup can enable Google to display user-generated star ratings directly in search results.

Regularly monitoring and analyzing your SEO efforts is essential for ensuring that you are continuing to improve your rankings. Search engines are constantly updating their algorithms, so implementing best practices today may not be the same as tomorrow. Using tools like Google Analytics and Google Search Console can provide you with insights into how your online marketing is working to attract new patients and maintain a high search engine rank.

Taking a holistic approach to dental marketing is the most effective way to maximize visibility for your practice. Investing in the right digital marketing strategies, including website optimization, local SEO, content marketing, and PPC advertising will give you the visibility needed to compete with competitors for new patients. By focusing on these strategies, you can set your practice apart as an authoritative, trustworthy, and reliable source of dental care.

Google My Business Optimization

A well-optimized Google Business Profile is a must for any dental practice. It’s where potential patients get important information about your office, including address, phone number, and hours of operation. Plus, you can use it to post photos and videos of your team or your facility which can further increase visibility.

Optimize your GMB profile by using a combination of high-quality photos, relevant keywords, and an engaging description. This will help ensure that you’re showing up in search results for the terms most likely to be used by prospective patients in your area.

You should also be sure to regularly update your GMB profile to reflect any changes in your office, such as new services or technologies you offer. In addition, using local business schema — a form of structured data — can help make your listing stand out by allowing search engines to display important information like appointment availability right in your listing.

A strong Google Business profile can build trust among potential patients, too. When a prospective patient sees positive reviews, detailed information about your practice, and professional photos, they’re more likely to feel confident in your abilities and book an appointment. If you do have negative reviews, be sure to address them professionally so they don’t snowball into an overall negative impact on your business.

In addition to implementing local business schema, consider leveraging review schema markup to improve your listings’ prominence in Google search results. This lets search engines display user-generated star ratings alongside your search results, which can further boost credibility and visibility.

Finally, consider reaching out to industry influencers or authoritative dental blogs to submit guest posts. This can bring in a fresh audience, showcase your expertise, and earn valuable backlinks to your website.

Ultimately, the best way to maximize your online visibility is to implement a comprehensive digital marketing strategy that includes website optimization, social media, and search engine marketing. By focusing on these areas, you can be sure that your dental practice is being seen by the patients who need to see it.

Online Reputation Management

Online reputation management is an essential component of a dental practice’s digital marketing strategy. It aims to promote the practice’s reputation to prospective patients, increase website traffic, and generate more patient inquiries and appointments. This is achieved by conducting extensive keyword research and incorporating the relevant terms in website content, meta descriptions, headings, and picture alt text. In addition, implementing schema markup on pages that list treatment services can allow search engines to display a rich snippet in results that clearly shows ratings, prices, and other relevant information.

Another effective way to improve online visibility is by encouraging satisfied patients to leave reviews on Google. This can be done verbally at the end of a visit or by sending a link via email or text message. Lastly, utilizing social media platforms to post useful dental tips or office updates can help establish the practice as a source of valuable healthcare advice, further increasing the likelihood of positive reviews.

To maximize their visibility, dental practices should also strive to rank highly in local search engine results. This can be achieved by listing their business in reliable local citation and online directories, such as Google My Business, Yelp, and Healthgrades. It is important that the NAP (name, address, phone number) is consistent across all listings to ensure maximum visibility.

By implementing SEO best practices, including optimizing their websites and creating high-quality content, dental practices can improve their organic rankings. Moreover, by targeting location-specific keywords, they can boost their local SEO and ensure that their business appears prominently in search engine results when potential patients are looking for nearby dental services. In addition, engaging in guest blogging and outreach partnerships can provide a great opportunity to build organic backlinks to their website and further strengthen their digital presence and authority in the industry.

What to Expect From a Concrete Polishing Contractor

Getting quality polished concrete results requires experience. There are multiple variables in the polishing process outside a contractor’s control that must be dealt with for successful projects.

Concrete Polishing

One common problem I see in the industry is contractors skipping grits in the processing sequence. This can lead to floors that lack overhead reflective clarity. Contact Concrete Polishing Contractor Waco TX for professional help.

Concrete polishing contractors offer cleaning services for commercial and industrial flooring. They provide air, tumble and wheel blasting as well as surface abrasion, paint and rust removal and concrete floor restoration and polishing. They also do epoxy and urethane coatings, line marking and surface preparation for commercial, food, retail, warehouse, hospital and showroom floors.

Cleaner floors create a safer environment for employees and customers. Dirty and dusty floors are not only unattractive, but they can also lead to higher instances of injury and health issues. With the right daily maintenance routine and regular polishing, polished concrete floors will maintain their beauty and safety for years to come.

A polished concrete floor can be stained and dyed to make it look like a variety of different flooring types such as marble or stone. This is done by acid washing the concrete then coloring it with either water based or solvent based dye. The color is then sealed to protect the flooring. This process is very eco-friendly and works well in hotels, hospitals, retail stores and high rise buildings.

Polished concrete is also denser than conventional flooring materials which can help prevent the penetration of liquids into sub-flooring. This can save on costly repairs and replacements. It is also easier to remove spills on a concrete floor with a polished finish. This is because the smooth surface does not allow the spill to settle and form stains. It is important to use neutral-ph cleaners on a polished concrete floor, since acidic chemicals can damage the surface. This is particularly important for high traffic areas. A concrete contractor can advise you on the best type of cleaner for your floor.

Preparation

The first step of concrete polishing involves cleaning the surface to remove any existing coatings, adhesives or contaminants. This is an important step because it ensures a clean and uniform substrate for the grinding and polishing process. It may take a day or two to complete this stage.

Next, the concrete is mechanically ground using progressively finer diamond-impregnated pads to smooth and refine the surface. This step can take several days depending on the size of the floor and the desired level of gloss. A penetrating chemical, called a densifier is sometimes used during this stage to increase the hardness of the concrete and make it more resistant to abrasion.

Once the concrete is ground and polished, control joints and cracks are filled with an appropriate filler material to achieve a consistent appearance. This prevents the concrete from becoming dull or scratched as it is moved around the facility and also eliminates the need for future repairs.

Lastly, a protective sealer is applied to the concrete to protect it from damage and keep it looking glossy. Reapplying a sealer every two to five years will keep the concrete beautiful and long-lasting.

By choosing a Concrete Polishing Contractor, your facility can benefit from an elegant, shiny, and durable floor that will enhance your company’s image and improve employee morale. Regular maintenance with sweeping, damp mopping, and the occasional high-speed burnish with an 1,800-grit pad will maintain the shine. And, since polished concrete is a structural component of your building, it won’t require replacement like other flooring options. That means a substantial savings for your business.

Grinding

Concrete polishing is a process of progressive grinding, honing, densification and polishing that turns a dull and unattractive concrete surface into an aesthetically pleasing, highly durable, dustproof, light reflective and functional floor system. It has become one of the most popular floor systems in commercial flooring and is used in new construction, warehouses, distribution centers and manufacturing facilities as well as hospitals, retail stores, and restaurants.

The contractor grinds the concrete with diamond-segmented abrasives that create a smooth and shiny surface. This is done either dry or wet, depending on the conditions and sheen specification. Initially coarse-grit abrasives are used, similar to sanding wood. As the concrete becomes smoother, a finer-grit abrasive is introduced that eventually achieves a glossy finish.

After the sheen is achieved, chemical products are applied that harden and seal the concrete surface. This protects the concrete from the abrasive effects of normal use and cleaning chemicals, reducing maintenance costs and downtime in busy operations. It also helps the floors resist abrasion from heavy machinery, which extends their useful working life.

The contractor then adds a stain-guard to the polished concrete to make it resistant to chemical stains such as juice, soda, bleach and battery acid that can discolor the concrete. This product seeps into the pores of the concrete, protecting it from abrasion and making it easier to clean.

To increase traction on the floor, the contractor may add an anti-slip grit additive to the final coat of sealer. This provides increased traction and prevents slipping, even when the floor is wet. The contractor may also recommend the addition of rubber mats or area rugs in high-traffic areas where traction is an issue.

Polishing

Concrete floor polishing involves specialized equipment that grinds the concrete’s surface with diamond disks to achieve the desired level of shine or smoothness. It’s not a do-it-yourself project, and it should only be undertaken by an experienced concrete polishing contractor. It’s a process that requires extensive knowledge of the equipment and the ability to follow all proper safety procedures.

There are both wet and dry methods of concrete polishing. A wet method uses water to cool the abrasive discs and help create a slurry to remove any dust. A dry method utilizes industrial vacuums to eliminate the need for water and produces a cleaner result.

The duration of the concrete polishing process depends on the desired sheen or gloss level and the size of the project area. A basic finish can be completed in one to two days for most industrial and commercial spaces. A high-end finish takes longer to complete and may require additional steps for more intricate design patterns and color matching.

During the grinding and polishing processes, your concrete contractors will also apply stain guards and anti-slip grit additives to enhance the look of the floor. These products are then sealed to provide a protective layer that resists oil, grease, and other chemicals.

Chemical resistance is a concern for many customers, especially in pharmaceutical or food processing facilities. While polished concrete is relatively resistant to etching and staining from most household and industrial cleaning products, strong acids and caustic chemicals will discolor and damage any unprotected concrete.

For this reason, your concrete flooring contractors will most likely recommend a chemical-resistant performance coating. It’s an easy way to add a beautiful, long-lasting appearance while protecting your concrete floors from the damage that chemicals can cause.

Sealing

Concrete is very porous & absorbs a lot of water, chemicals & oil. This can cause the concrete to deteriorate, leading to cracks & spalling. To avoid this, a protective sealer is often applied to the surface. A professional contractor can recommend the best sealer for your space & situation. Depending on your facility, you might choose a penetrating concrete densifier, a siloxane sealer, an acrylic sealer or a polyurethane sealer.

When the surface is dry, it can be burnished to achieve a high-gloss sheen. The process involves using a machine that heats, melts & buffs the sealant into a polished concrete surface. This will prevent dusting & protect the floor from stains & moisture.

The specialized equipment used to grind & polish concrete floors can be expensive, heavy & difficult to operate if you don’t know what you’re doing. Trying to perform these tasks on your own could result in expensive damage to the concrete, personal injury & a big mess to clean up.

A professional masonry contractor will have the proper equipment to do the job in a timely manner & within budget. It’s important to prepare the area before their arrival & have any inventory, stock or furniture moved out of the way so it doesn’t get damaged. It’s also a good idea to close off any areas that can be affected by dust or water.

It’s also a good idea to wear a respirator approved for working with volatile organic compounds (VOCs) as they are present in some of the coatings & sealers used on warehouse concrete. VOCs are known to cause short & long term health effects. A properly sealed concrete floor will last much longer than unprotected concrete & is less expensive to maintain.

Navigation