American Plastic Molds are the tools that create the shape of your plastic products. It’s important to choose the right one for your project to avoid common pitfalls that can set you back weeks or even months.
The process of injection molding produces very little waste, making it an excellent choice for manufacturers who are concerned about sustainability. This method is also suited to high-volume production runs.
In extrusion molding, polymer granules are heated to a soft or liquid state and then forced through a die — a shaped hole. The plastic takes on the shape of the die as it moves through, forming a long molded product that can be cut to length. It’s a simple process, but it allows manufacturers to produce a wide range of products. For example, extrusion molding is used to make PVC water and sewage pipes, curtain tracks and blinds, wire conduits, and many other items.
This type of plastic molding is also popular for making very thin sheets and films that are used in a variety of ways. Examples include transparent alternatives to glass, protective coverings for machine parts, and materials that replace the plastic used in packaging for food and medicines. Extrusion molding is also good for making long shapes, like wiper blades for car windshields and vinyl signs.
The raw material used for extrusion molding is usually a thermoplastic. It begins as a bundle of tiny pellets or granules, which are stored in a hopper before being delivered to a heated barrel. The heat and pressure in the barrel quickly transforms the granules into a molten plastic that is then pushed through a steel die. The die’s shape determines the cross-sectional design of the finished product. The cooled and solidified extruded plastic is then colored (if necessary) and cut to specific lengths.
Extrusion molds can be crafted to handle a wide variety of polymers, including engineering thermoplastics and thermoplastic elastomers. However, this type of molding does have some limitations. For example, it’s not as efficient at producing complex and three-dimensional shapes compared to injection molding. Also, the surface finish of extruded products can be less precise than molded parts produced through other processes.
As the popularity of this process continues to grow, manufacturers are constantly improving the equipment to increase production efficiency and quality. There are a number of benefits to using this type of molding, including its lower tooling costs and energy efficiency, which can make it more cost-effective than other types of plastic molding.
Rotary Moulding
A low-pressure process that involves rotating a powdered plastic resin inside a hollow mold. This is done with three separately-rotating ‘arms’, one for loading and unloading the moulds, another for heating, and the third for cooling the product. The resulting hollow, shaped plastic component is then opened to be removed. Rotomolding offers many advantages over other plastic manufacturing methods, including a high-quality finished product, inexpensive tooling and production time, and less wastage of the resin than in other processes. It is also suitable for producing large, double-walled parts and complex shapes.
The polymer resin used in rotary moulding varies according to its chemical and physical properties and the intended application of the finished product. Additives are often added to enhance the mechanical properties of the resulting product. Flow modifiers, for example, help the molten plastic to spread evenly within the mold, while heat stabilizers prevent degradation due to the rapid temperature change. The choice of the optimum polymer for a particular project is crucial and may require a trial run of a sample of the finished plastic part.
Other additives include impact modifiers, which improve the strength of the plastic, and fillers, which are inserted into the polymer resin to make it more dense. The final plastic product is usually sealed with a protective coating to give it better resistance against weathering and corrosion.
It is important to ensure that the draft angle of a product design is incorporated into the mold design, as this will affect how easy it is for operators to remove the finished product from the mould after the rotational melting, cooling and expansion process has been completed. The wall thickness of a product is also a factor as thicker walls increase the strength and durability of the product but also raise its material costs. Smart product design, based on how the product will be used, can help to optimize this cost/strength balance by incorporating reinforcement ribs such as kiss-off ribbing.
The cooling cycle is a critical step in the rotary molding process. It allows the polymer to contract, solidify, and harden to its final shape. It is usually aided by water, air, or a combination of both to achieve the best results. During this step, the molded plastic must be handled with care to avoid damage from excessive pressure, hot surfaces, or high speeds.
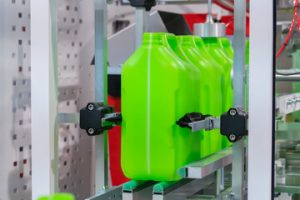
Injection Moulding
Injection moulding is a highly efficient, repeatable production process that yields products with dimensional tolerances of +/- 0.005”. This makes it an ideal choice for high volume production runs. It is also an environmentally friendly, economical process with low scrap rates and minimal post-production work.
In the injection molding process, raw materials are melted by heat and injected into the mold under high pressure to fill it quickly. The molten plastic then cools and solidifies into the shape of the molded product. The plastics used in injection molding are typically thermoplastic, such as nylon, polystyrene, and polyethylene, or thermosetting such as epoxy and phenolic.
After the molded product has cooled, ejector pins (circular pins) push it out of the injection mold to separate the two halves of the plastic. The ejected product is then placed on a conveyor belt or dropped into a bucket for storage.
During the injection process, molten plastic flows from the barrel of the injection machine through a nozzle that seats against a surface on the tool called the sprue bushing and locating ring. The sprue bushing then splits into runners, which transport the melted plastic to individual gates that lead to each cavity in the tool. These channels are filled with a working fluid such as water, oil, or sometimes steam, which helps to disperse the heat of the injection melt.
The amount of injected material and the injection pressure determines how fast the cavity is filled. The flow characteristics of the melted plastic influence the injection pressure, and the required injection pressure must be carefully balanced with the desired injection time to maintain proper filling. Injection times and injection pressures must be carefully controlled to avoid problems with wavy surfaces, surface defects, warping, and part leakage.
One of the benefits of injection molding is that it can accommodate complex design elements such as hinges, threaded parts, or specialized surface textures in a single part, eliminating the need for additional assembly and saving time in production. Injection molding can also incorporate metal components into a plastic component such as a latch or fastener, which can provide strength and durability and reduce cost.
Pressure Moulding
As its name suggests, this process relies on a combination of high pressure and low temperature. The result is a plastic part with a high degree of dimensional accuracy and a good surface finish. This is particularly useful for larger parts like car parts, bins and kayaks, as well as hollow items such as storage containers and pet houses. This method is also much more material efficient than others. It wastes very little plastic compared to other processes.
Injection moulding is a popular manufacturing technique, widely used across many industries and product sectors. It begins with plastic pellets being fed into a heated cylinder or barrel. A motorized screw, positioned inside the cylinder, then mixes the pellets until they become molten. A sprue bushing, which sits on the injection nozzle, then distributes the molten plastic into the mold cavity. A locating ring then fits over the sprue bushing and helps place the injection nozzle in the right position for molding.
After the molten plastic has been injected into the mold, it’s subjected to high pressure, typically between 1,000 and 30,000 psi. This pressure forces the plastic into any gaps in the mold, and helps create a complete part. This process is very fast, and can produce a high volume of products in short time frames.
There are three forms of pressure involved in plastic injection molding – clamping, injection and holding pressure. Each has its own benefits and drawbacks, but balancing these pressures correctly is key to a successful outcome. If the clamping pressure is too low, the resulting plastic may not be as dense or as strong as it could have been. Likewise, if the injection pressure is too high, the plastic can be forced into areas it shouldn’t go, which may cause defects.
Injection molded plastic parts can be difficult to modify, due to the costly tooling required to manufacture them. However, with the help of the streamlined low-pressure injection molding process, this can be made easier. By reducing the amount of pressure applied during the process, it’s possible to make changes to an existing product or component without having to invest in a new mold.