Benefits of Microneedling

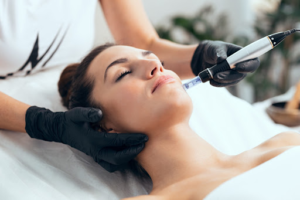
First, numbing cream is smoothed over the face. Then, the person performing the microneedling moves a pen-shaped device with needles over the face.

The controlled trauma and thousands of tiny pokes cause your body to start a healing process. New collagen fills fine lines and wrinkles, shrinks pores, reduces dark spots, and improves rough skin. Contact MICRONEEDLING SAN DIEGO now!

If you have acne scars, microneedling might be just what the doctor ordered. The treatment involves puncturing the skin with small needles, encouraging your body to regenerate collagen. It can also plump fine lines and wrinkles, smooth out rough texture, and even out brown spots and large pores.

During the procedure, your dermatologist will numb your face to prevent or lessen pain and discomfort. They will then use a penlike tool called a derma roller to insert tiny, stainless steel needles into your skin. The needles vary in length from 0.5 to 2.5 millimeters. They are spaced closely enough to cause “microinjuries” in your skin, but not so close that they cause bleeding or skin damage. The tool will then move evenly over your skin to create a uniform result. Some providers will apply a growth serum or other cream afterward.

The process is very quick and relatively painless, with little to no downtime. Some redness and irritation may occur, but this is a natural response to the minor injuries the needles cause in your skin. You should avoid using any products that might irritate the tiny wounds, including harsh cleansers, for the first 24 hours.

After a few days, the redness will fade and your skin will look smoother and more youthful. This is because the tiny holes created by the needles stimulate your skin to produce more collagen and elastin, which will make your complexion look smoother and healthier.

Another major benefit of microneedling is that it can significantly improve the appearance of acne scars, particularly pock marks. Studies have shown that after four treatments over a month, people with severe acne scars saw improvement in their skin tone and texture.

In addition to improving the appearance of acne scars, microneedling is also effective in minimizing stretch marks and other discolorations and in stimulating hair growth in those with alopecia. But a consultation with your dermatologist is key to determine whether it’s the right treatment for you. A dermatologist will be able to tell you how many sessions of the procedure are needed to achieve your desired results. Typically, those who want to reduce the appearance of fine lines and wrinkles will need just two treatments, while those with deeper scarring or burns might require more, as well as more frequent visits, depending on their needs.

Pock Marks

Many people who have pock marks from acne scars find that microneedling works very well to fade the appearance of these marks and smooth out the skin. When the needles puncture the skin, your body responds as if there is a real injury and starts producing collagen to repair the damaged area. This process is what leads to the smoothing of your scars and the overall smoother look of your complexion.

When you get a professional treatment, the practitioner will usually apply a numbing cream to your face so that you don’t feel the tiny needle pricks. Then, the technician will move a pen-shaped or rolling device with tiny needles over your face. The needles will make small cuts in the skin, which causes a bit of bleeding, and then your body will start the healing process. This stimulates the production of collagen, which helps reduce wrinkles and tightens skin.

During this process, your skin may experience some bruising or swelling for a few days, but it usually goes away without any further treatment. In some cases, you can get a more extreme reaction to the procedure, which is why it’s best to have this done by a professional who has experience and knows how to avoid causing an infection. It’s also important to avoid using self-needling devices unless you are absolutely certain that they are clean and sterilized to avoid an infection.

If you want to see a more dramatic improvement, consider getting microneedling in conjunction with PRP (platelet-rich plasma). In addition to the healing properties of your blood, this treatment also helps boost collagen and elastin levels. It’s also great for fading hyperpigmentation, especially in women with darker skin tones. Your dermatologist will draw a small amount of your blood into a test tube and then run it through a centrifuge to separate the platelets. Then, they will apply the platelet-rich blood to the skin that has been microneedled, and this combination is especially effective for fading dark spots and improving skin tone.

Rough Skin

Probably the best known microneedling benefit is that it helps your skin look a lot younger. It does this by stimulating your body to create more collagen and elastin, which in turn reduces wrinkles and fine lines and tightens your skin. During the procedure, small needles poke into your skin to trigger a rejuvenation response. You can do this in-office or at home with a device called a dermaroller. Typically, the needles on these devices are shorter than those in an office treatment, so they don’t create as many tiny wounds to your skin.

The pricks that you get from the procedure might make your skin a little red, but they will heal quickly. If your skin is particularly sensitive, your dermatologist might use a topical anesthetic or numbing cream first. Depending on the area being treated, it might take 20-30 minutes for it to work. During the actual microneedling, it might feel like you are having an electric toothbrush rubbed over your face. It might hurt a little, but it should only be a 2 or 3 on a pain scale.

In addition to reducing the appearance of scars, microneedling also improves rough skin. That’s because it helps your body remove any dead skin cells that might be clogging your pores, which can cause bumps and roughness. It can also help clear up acne and prevent future breakouts by reducing oil production on the skin, which is what causes black heads and pimples.

If you’re not ready to shell out $100-plus for an in-office treatment, there are a crop of products aimed at allowing you to perform your own microneedling at home. These are called dermarollers and they come in various prices. However, the needles on these DIY tools are much shorter than those on medical-grade equipment (0.5 to 2.5 mm) so they don’t create as many tiny holes to your skin, which limits their ability to stimulate collagen production.

The most important thing to remember about the procedure is that it may not work if you have bleeding or clotting disorders or are on blood thinners. Your dermatologist should ask about your medical history before you decide to do it.

Fine Lines & Wrinkles

Fine lines and wrinkles become more noticeable as we age, but microneedling can help reduce their appearance. The procedure uses a pen-shaped tool with tiny needles to make many small pricks in your skin. These pricks don’t cause much bleeding, but they do stimulate the skin to heal the wounds and produce collagen. The new collagen-rich tissue tightens the skin, smoothing out fine lines and wrinkles.

Microneedling is also an effective way to even skin tone and texture. During the treatment, your dermatologist will apply a numbing cream to prevent pain from the needles. They will then move the device over your face, creating tiny injuries that aren’t noticeable to the naked eye. They may finish the session by applying a growth serum or calming treatment to soothe your skin.

After the procedure, your skin might be red or flaky for a few days while it heals. It may also bleed or bruise slightly, depending on how deep the needles penetrate. Your dermatologist will provide you with care instructions to help your skin heal quickly. In the long term, your skin will look more even and brighter.

Your dermatologist will advise you to avoid skincare products that can make your skin more sensitive, such as strong exfoliants and retinoids. You should also tell your doctor if you have a bleeding disorder or take blood thinners.

A study published in the journal Plastic and Reconstructive Surgery tested the effectiveness of microneedling for acne scars. The study found that the procedure helped improve all of the scars in the test subjects. The results showed that patients with darker skin types (Fitzpatrick skin type IV and V) saw greater improvements than those with lighter skin.

The microneedling process can be done in-office or at home. In-office devices have sharper needles than those used in at-home kits, but both treatments are safe when used by a trained professional. If you choose to do your own microneedling at home, it is important to use a clean and sterilized needle, and to be careful not to over-prick yourself.

How Sealcoating Protects Your Asphalt

Sealcoating is an important process for protecting asphalt surfaces from weather and car pollutants. It will extend the life of your pavement and can save you money in the long run.

Sealcoating

The weather conditions must be right for a successful application. It can’t be too hot or too cold, and it should not rain within 24 hours of application. Visit https://www.rochesternysealcoating.com/ to learn more.

Before the actual sealcoating can take place, the asphalt surface has to be prepared. The pavement has to be clean, dry, and free of any debris, dirt, or oil stains. In addition, it is important to turn off the sprinkler system for the entire parking lot, and a fence or other means should be erected to block pedestrians and vehicular traffic from entering the area until it has been properly sealed and allowed to dry.

Once the surface has been cleaned, the cracks must be filled using hot or cold crack fillers to prevent water from seeping under the new coating and further damaging the asphalt. Next, the surface must be swept and washed to remove any remaining debris or dust. Depending on the size of the parking lot, you might want to consider renting a ride-on sealcoating machine with a squeegee or a spray system. Both of these tools allow for faster application and more accurate placement, as well as providing better traction for vehicles.

A quality sealcoat protects a paved surface by filling small cracks, increasing the surface’s friction, and adding a new layer of protection. This is essential for a smooth, safe driving surface, and is especially important for high-traffic areas such as shopping malls or airports. It also helps to prevent the expansion of small cracks into larger ones in winter, which can cause potholes and expensive repairs.

Another benefit of a quality sealcoat is its ability to prolong the lifespan of your asphalt. The seal coat acts as a protective barrier against the elements, weather, and even sun damage, keeping your parking lot looking like new for a longer period of time.

If you have an older parking lot, it is vital that you invest in a sealcoat as soon as possible to protect it from the elements and prevent damage. With proper care, your sealcoat can last for up to a decade or more.

A professional contractor will be able to advise you on the best maintenance schedule for your specific parking lot. They will also be able to identify any problem spots and address them early, saving you the expense of larger fixes down the line.

Application

Keeping asphalt in good condition requires regular maintenance and the application of sealcoat. This process prevents degradation caused by weather, vehicle traffic, oil spills, and other chemical substances that penetrate and soften the material. When the material is weakened, it becomes brittle and more susceptible to damage. Sealcoating provides a barrier that protects the surface, and when used properly, extends its lifespan significantly.

First, the surface must be thoroughly cleaned. A power broom or blower should remove any loose dirt, leaves, or debris. If there are any oil stains, a degreaser or detergent should be applied to eliminate them. If the area is especially dirty, a pressure washer may be needed to ensure a clean and effective finish. This initial step is essential; any sealant applied to a dirty surface will not adhere effectively and can lead to patchy areas.

Once the surface is ready for application, barriers should be set up to keep people or vehicles from entering the work area. This will allow the sealant to be applied evenly without disturbance and allow for a quicker curing time.

It is also important to choose the right type of sealcoat for your climate and weather conditions. Two primary types exist, coal tar-based and asphalt emulsion-based. Coal tar-based sealcoats are more durable, but can have environmental and legal concerns in some areas. Asphalt emulsion-based products are environmentally friendly and are commonly used for residential and commercial asphalt applications.

The type of sand used in a sealcoat mix is also important for the final product. Coarse and fine sand must be screened to ensure that the proper particle size is being used. Using a sand that is too coarse or too fine will result in a sealcoat that is too thick and will not flex or adhere well to the pavement.

Before the actual application of the sealcoat, it is essential that all cracks, potholes, and other damaged areas are repaired. This will allow the asphalt to be more evenly protected and extend the lifespan of the material.

Once the sealcoat is applied, it must dry completely before it can be used. This can take a few days depending on the temperature and humidity. The best way to speed up the drying process is by using a product such as nano-cure, which reduces the amount of moisture in the air and allows the sealcoat to dry faster.

Curing

Once the asphalt has been sealed, the process moves to the curing stage. This is a critical step that helps determine the durability and effectiveness of the sealcoat. During this time, it is important to keep the surface free from traffic as it cures. The best way to do this is by putting up temporary signs that direct people to use alternate parking areas or even to park at home during the curing process.

The curing process can take up to two days. During this time, the sand particles in the asphalt will interlock to create a strong bond with the new coating. This will give the sealcoat additional strength and resistance to damage from the elements and traffic. The temperature of the surrounding area also plays a role in how quickly the sealcoat can dry. For this reason, it is often better to apply the coating in warmer weather when conditions are more favorable.

Before the curing begins, the surface is swept to remove any debris. Once the surface is clean, a primer is applied to prepare the asphalt for the sealcoat. The primer has built-in polymers and surfactants that help it to penetrate into the polished aggregates, creating an adhesive surface for the sealcoating. This is an extremely important step in the overall application of the sealcoat.

After the primer has been applied, a thin coat of the sealcoat is then applied to the pavement. The contractor may use pressurized spray equipment, self-propelled squeegee machines, or hand painting techniques depending on the project requirements. Typically, a second thin coat is required and the entire work area must be adequately cured before vehicles are allowed back on the lot.

Depending on the type of sealcoat used, it can take 24 to 48 hours for the paving material to be ready for light pedestrian traffic and up to 72 hours for vehicle traffic. During this time, it is essential to avoid any type of oil spills or harsh chemicals that can harm the coating. Keeping the paved surface free of oil spills and regular cleanings will extend the life of the sealcoat and ensure that it is effective for years to come.

Maintenance

Keeping your asphalt pavement well maintained can extend the lifespan of your parking lot or driveway and help you avoid costly repairs in the future. The best way to maintain your asphalt is through regular sealcoating. Seal coating restores the jet-black appearance of your pavement, fills in cracks, and helps your surface resist water penetration. It is a simple, cost-effective solution that will enhance the look of your property while reducing the need for expensive repair and replacement.

Before sealcoating, it is important to make sure that the surface is free of debris. This includes weeds, loose gravel and dirt, and old sealant. The area should also be blocked off for 24 hours while the sealant cures. Sprinkler systems should be turned off, and all vehicles should be removed from the surface. This will allow the sealcoat to dry and bond properly.

Once the sealant is applied, workers will hand squeegee the edges to provide clean, crisp lines and extra sealer. This step is essential in ensuring that the new surface will be resistant to traffic. Once the sealant has cured, the surface will be reopened to vehicular and foot traffic. In order to protect the newly sealed surfaces, you should put up signs indicating that vehicles and pedestrians should stay off of the area until it is fully cured.

Ideally, your asphalt should be resealed every other year to extend the life of the surface. However, the frequency of resealing will depend on your climate and traffic volume. Consult a professional to determine the appropriate schedule for your specific needs.

Whether you have an industrial lot or residential driveway, a sealcoat will help extend the life of your pavement and minimize the need for expensive repair. It will protect your investment, enhance the look of your property, and increase its value.

Stucco Repair Is a Good Option For Surface Level Damage

Stucco Repair Philadelphia consists of sealing or repairing holes and cracks found in the stucco itself. It is a good option for surface level damage that does not involve mold or water damage to sheathing and framing.

Damp looking stucco, especially around windows, is a sign that moisture intrusion may be present. Moisture problems will only get worse if not addressed immediately.

Stucco is a beautiful and durable siding option for homes, but it’s not immune to wear and tear. Like all exterior surfaces, stucco needs to be properly maintained and repaired to keep it looking its best and functioning at its best. Cracks, stains, discoloration and other damage are not only unsightly, but they can also indicate underlying issues that require professional attention. If left untreated, these problems can escalate into more serious structural damage to the building envelope.

Small cracks in stucco can be easily fixed with caulking. Using a caulking gun, apply a caulk designed for use with stucco and smooth it out with a trowel to ensure it blends in with the surrounding surface. It’s important to allow the caulk to cure undisturbed for 24 hours, as this will give it a chance to properly set and harden, ensuring a long-lasting repair.

For larger cracks, a stucco repair contractor should be called in to help troubleshoot and decide the proper course of action. Cantor recommends that homeowners take a walk around their homes once or twice a month to look for damage, such as cracked or chipped stucco, holes, buckling or bubbling. It’s especially important to look up at your home from the ground to check for any bowed or leaning areas.

If the cracks are hairline, they can be fixed with a simple patching and painting. First, the cracks should be cleaned and brushed to remove any loose debris. Next, the crack should be primed with a product such as Smith & Co. Damp Concrete Primer (DCP), which is mixed with water to create a tan emulsion. This priming will help the caulk stick to the crack.

Finally, the crack should be patched with a stucco patching mix that is either pre-mixed and ready to trowel on or conventional stucco repair mix that can be mixed in a wheelbarrow or plastic tray according to manufacturer instructions. After the patch is applied, it should be troweled to match the texture of the surrounding stucco and left to cure for another 24 hours.

Structural Damage

Stucco’s durability and insulation qualities add value to buildings, but over time it can develop certain issues that must be addressed promptly. These problems may not only reduce the value of a home but also increase the cost of maintenance and repair. Detecting stucco damage in its early stages is critical to protecting the integrity of walls and preventing moisture infiltration that can lead to serious structural problems.

The most common sign of stucco damage is the appearance of cracks. While small hairline cracks are normal, it’s important to watch for larger cracks or widespread cracking. These can signal a major problem with the foundation or other structural problems within the building. Water stains and discoloration on the surface are another indication of moisture infiltration. If left untreated, this can lead to rot within the wall and a collapsed structure.

When moisture seeps behind the stucco, it can erode the wood support beams that hold up the walls and other portions of a building. This can cause a collapse of the entire structure or even other parts of the house. This can also rot the interior of the building and lead to health issues for residents.

Stucco repair is a complex process that involves meticulously assessing the condition of the stucco and identifying the source of moisture infiltration. Removing the damaged area and addressing the underlying problem will help to prevent future moisture infiltration. This may involve waterproofing, removing and replacing the damaged materials, or improving ventilation to decrease moisture buildup.

Many homeowners attempt to repair stucco themselves to save money but this can be a mistake. For example, covering a hole in the stucco with duct tape will not stop the leak but will instead make it worse. Hiring a professional who is experienced in stucco applications will ensure that all repairs are made properly the first time, saving homeowners from expensive repairs in the future.

For historic stucco, it’s particularly important to understand the history of the construction and the materials used for the original work. This is to ensure that the repair is carried out in a way that is compatible with the historical materials and does not exacerbate any deterioration that has already occurred. For example, using hard cementitious materials in the repair will increase the rate of deterioration since these are incompatible with the lime based render used for historic stucco.

Mold and Mildew

Stucco can withstand a lot of damage, but if moisture gets behind the surface, mold and mildew will begin to grow. If you notice a musty smell, stains, or discoloration, call a stucco remediation company immediately. Mold can lead to a number of health issues, including headaches, allergic reactions, and respiratory damage. If the mold is allowed to spread, it can also damage the integrity of the stucco and cause further deterioration.

Moisture behind the stucco can be caused by a variety of factors, such as flooding from heavy rains or incorrect installation. Moisture can get into gaps between the stucco and wood framing, through loose or broken window frames or doors, and even through cracks. Moisture can also be a result of a home being located in a humid or rainy climate, which accelerates the wear and tear on stucco.

The best way to prevent mold and mildew from growing on your stucco is to keep up with regular maintenance inspections, which should include checking for cracks and other problems. Small hairline cracks can be sealed with a caulking compound, which will stop them from widening and allowing moisture to seep through. For larger cracks, it is best to consult a stucco professional.

Another thing to look for during an inspection is the condition of exterior weather barriers and flashing. These will need to be replaced or repaired as needed to ensure that water is not being allowed to penetrate the stucco and into your home.

Remediation is a more expensive service than simple repairs, and it’s understandable that homeowners may not want to invest in this unless they need to. However, continuing to postpone remediation will only lead to skyrocketing repair costs in the future.

Remediation is a more in-depth service than simple repairs and involves digging down through the stucco to find and fix the underlying issue that’s causing the deterioration. This can be as simple as repairing a hole in the wall, or it can involve inserting probes into suspected areas of moisture to take a reading and determine how extensive the problem is.

Water Damage

Stucco is a beautiful, durable material that offers many benefits for homes and buildings. However, like any other material, it can be damaged by moisture and water. The resulting damage can result in unsightly spots, mold and mildew, or structural damage to the home or building. If the cause of the water damage is not addressed quickly, it can lead to costly repairs or even a full replacement.

One of the most common causes of stucco damage is water leaks that go unnoticed and allow moisture to get behind the walls. A professional inspection can reveal the extent of the problem, which may include a leaking roof or faulty plumbing. In some cases, the cause of the water damage to the stucco may be covered by homeowners insurance.

If you are concerned about your stucco, it is important to walk around the outside of your home once a month and inspect it for chips, cracks, holes, buckling or bubbling. It is also a good idea to use a ladder to check the upper levels of your home, as this is where moisture can accumulate. If you notice any signs of moisture damage, a professional can use a moisture meter to determine the extent of the moisture and recommend a suitable repair solution.

Other signs of water damage to stucco include damp looking areas, especially after a rainstorm, and stains or discoloration on the surface of the stucco or interior walls. Peeling paint can also be an indicator of moisture problems, as well as a musty smell inside the house.

When performing stucco repairs, it is important to follow all applicable safety procedures and wear appropriate personal protective equipment (PPE). A moisture meter and a thermal imaging camera are useful tools for identifying the level of moisture in the stucco before starting the repair process. Using these tools will help to ensure that the repair is successful and that the problem is completely resolved. It is also a good idea to conduct a quality assurance check of the repaired area with the moisture meter and thermal imaging camera once the work has been completed.

Navigation